In order to test the battery of your electric scooter, you will require to own a few tools and to follow a few simple steps.
The tools in question are as follows:
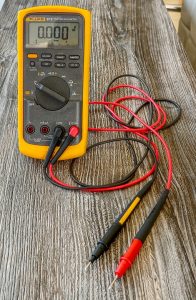
- A multimeter or a Voltmeter (I recommend a digital multimeter for precision and ease of use);
- A screwdriver;
- A set of hex wrenches;
- A simple wrench, depending on what screws the manufacturer used.
After that, you will have to follow the following steps:
- Have your battery charge for 7 to 8 hours.
- Immobilize the scooter; you will need it to remain still, due to the battery being functional and risking to start.
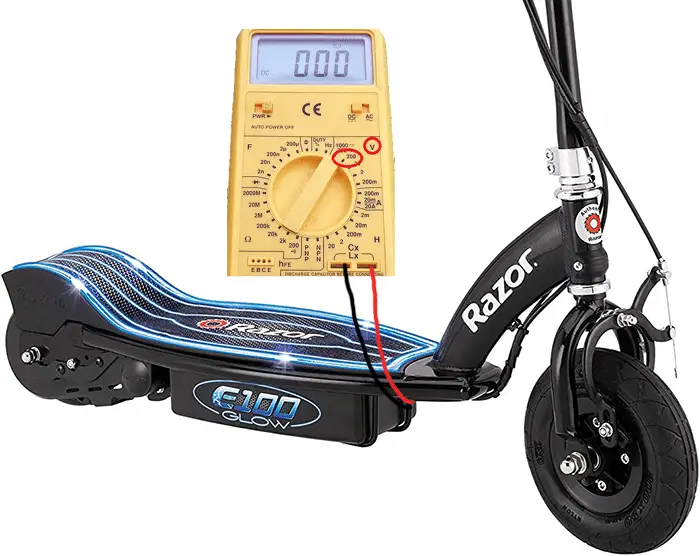
- Take the multimeter or Voltmeter and set its function selector to DC Volts V – or VDC on a value of 200;
- Turn the scooter’s power settings off. Then connect the multimeter probes to the battery pack terminals and then finally read the Voltage.
- Lastly, get someone to stand on the scooter so that it stays put. Turn on the scooters’ power and have the person engage the throttle a few times. Finally, read the voltage while the throttle is engaged.
- Aim for a battery pack voltage that is equal or a bit higher than the voltage rating of the scooter. If the rating falls below that by more than 2V, it means that the battery is faulty and needs a replacement. The voltage rating of your scooter is represented by the added value of your batteries. For example, 2x12V batteries add to 24V.
Here is a video describing the process:
How to diagnose your e-scooter batteries?
The usual e-scooter battery will come with two cables attached to it or included. Both are to be connected to the battery, with each having its own function. They are:
>>> Check out our article about the best electric scooter accessories here <<<
- The discharging port: Without this cable that is connected to your motor, the scooter won’t function.
- The charging port: this is what is used for charging the battery. Despite the possibility of coming in other colors, depending on the manufacturer, it usually comes in a red and black combination.
The black cable represents the negative and the red one is positive.
How to do it
You take your hex wrenches/screwdriver and open up the battery panel. Take the top off, which will expose the internal battery and the cables. Make sure that if you do it outside you don’t sit in the sun or that it isn’t humid.
Same if you do it inside. Humidity and direct sunlight will shorten those components’ lifespan by a significant margin.
Connect the cables to the multimeter
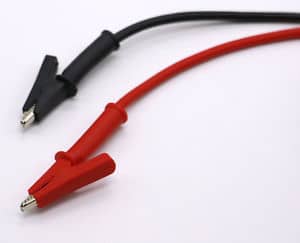
First, you will have to take your multimeter or Voltmeter and have the two red and black cables connected to the multimeter respective ports. Make sure to connect them to their right terminals: red to red and black to black. The red -positive- should go in the 10ADC multimeter port and the black -negative- in the V(omega)mA port.
All in all, red goes above and black goes below. Or black goes left and red goes right if you have a multimeter with horizontal ports like the one in this photo.
Connect the terminals to the electric scooter battery
You then take the two cables and connect them to the respective terminals within the scooter. You will know which is which by the red and black cable coloring. The batteries are connected to the scooter through some plastic clams. Separate them. So, the black -negative- cable goes into the black -negative- terminal, while the red -positive- one follows the same procedure.
The cables (from the multimeter) should be pointy at their end, so try to wedge them into the battery terminals. It should be fairly easy since they were made for this. Be sure that, when sticking the pointy stuff into the pin, it touches the metal and not only the plastic. You need that to connect with the metal in order to get a good, uninterrupted reading. Otherwise, you will get no reading.
If you have a cable with crocodile connectors like in the photo below, it may be easier to connect them.
Take the measurements
Next, set the meter to DC – it should be up-left side on the meter-. The multimeters typically come with the DCV function there on 200m – 2000m – 20 – 200 – 1000. Set it on 200, since you need a reading of above 20.
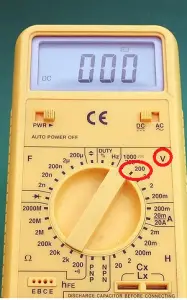
Also, switch the off-on button to on for it to function. Although this is fairly obvious, those multimeters are full of numbers and stuff that confuse many people.
You will have to make sure that the batteries are fully charged so that you can get a fairly consistent reading. One thing you should do is test your batteries when they are fully charged for the first time. Write down the value.
Use it as a reference point for future testing, since this is when they are at their strongest. This will allow you to tell how quickly your batteries lose their “juice” in accordance with charging and usage.
You don’t want your meter to show a fall of more than 1 to 2 Volts under the Voltage rating. If so, it means that the battery has lost its effectiveness and it might be the time to change it. Always take care of them and make sure to test your batteries whenever you feel a drop in performance.
For example:
Let’s say that your scooter holds two 12 Volt battery packs for a total of 24 volts. Keep in mind that, when fully charged, your battery tests might show more than the added sum. So, two 12V batteries might show a 26 or a 27. This is great since it means that they are strong and healthy.
What you will want in this case it for the batteries to not fall under 22-23. This means that their juice is spent and that you will need new batteries. If disposed of, be sure to always recycle them. Types of batteries include Lithium-Ion batteries, Sealed Lead Acid, and Nickel Heavy Hydride batteries.
A note of caution from the author: an e-scooter battery is not like a phone battery. Unlike that, which people usually charge only when close to being depleted, e-scooter batteries should be charged whenever it’s possible. Always keep it “alive” or it will lose effectiveness fairly quickly. It’s recommended to keep the battery level above 30-40% at all times.
Testing methods
There are two testing methods out there:
The passive method and the active method.
The passive method, as shown above, is where you do the testing with your scooter on-off power.
The active method requires you to keep your scooter ON since sometimes, the battery won’t show any reading on the multimeter. This is due to its need for a ”kick” in power. How do you do this?
The steps to be followed are basically the same as before, but you will need to suspend the scooter. Also, you will have to leave the back wheel free (so no breaks engaged at first).
After that, jack up the rear wheel and give it one to a few good and full throttles. Pay attention to the readings. Now, while throttling, engage the read breaks. It should create what is known as a “load” and this is what you require for the test.
While the “load” is in action, you will see the voltage on the multimeter dropping. The more it drops, the worse the battery is. So, a good battery will both drop slowly and just a little. A bad one, on the other hand, will drop more severely.
Another active way to test the battery, if you have the spare time, is to ride it. Fully charge it, get on a flat surface and ride it at full throttle. A good battery should, at full throttle, last for about 40-50 minutes. If it falls under 30, then it might be a faulty battery. 10-15 minutes requires you to immediately remove it and change it with another one.
Alternative method
There is, also, an alternative method that involves your friendly neighborhood auto part sales stores. Or local mechanics. The idea behind this method is to ask them if they can load test your type of batteries. Read the manual to know which one your e-scooter sports. If so, it is all fine and dandy. You will not have to spend your precious money and time on the aforementioned equipment and procedures.
Be cautious, because they are not obliged to repair anything. They might allow this, but if you lose track of the cabling order, they will probably not even bat an eye. So, before you take it to them, take a picture and draw a sketch of the cabling. You will want to know which thing goes where when you are done and ready to put it back.
This includes the wiring harness because you want your cables to be protected. This might not even be a thing to do, once you get the hold of it.
Afterward, remove the wiring harness from your batteries and take them to the testing site. If everything goes well, you are all good. All you will have to do is to reattach everything as it was. If not, and your battery voltage is sub-par, you will probably have to get a new one.
Useful articles on this topic
- how to charge your electric scooter – lots of useful tips on charging and storing the battery to prolong its life
- electric scooter battery cost – how much do e-scooter batteries cost
- types of batteries – what types of batteries do e-scooter use and their pros and cons
How to test Razor Electric Scooter batteries
Being a popular e-scooter nowadays, here is a short 3 minutes video that explains how to test Razor e-scooter battery:
Conclusion
Now, you should have a clear idea of how to test your electric scooter batteries. Make sure you test the batteries when you feel a drop in performance as this is the first symptom of a deteriorated battery.
>>> BEFORE YOU GO! Check out our article about the best electric scooter accessories here <<<